Selina Concise Physics Class 9 ICSE Solutions Measurements and Experimentation
ICSE SolutionsSelina ICSE Solutions
APlusTopper.com provides step by step solutions for Selina Concise ICSE Solutions for Class 9 Physics Chapter 1 Measurements and Experimentation. You can download the Selina Concise Physics ICSE Solutions for Class 9 with Free PDF download option. Selina Publishers Concise Physics for Class 9 ICSE Solutions all questions are solved and explained by expert teachers as per ICSE board guidelines.
Download Formulae Handbook For ICSE Class 9 and 10
Selina ICSE Solutions for Class 9 Physics Chapter 1 Measurements and Experimentation
Exercise 1(A)
Solution 1S.
Measurement is the process of comparing a given physical quantity with a known standard quantity of the same nature.
Solution 2S.
Unit is a quantity of constant magnitude which is used to measure the magnitudes of other quantities of the same manner.
Solution 3S.
The three requirements for selecting a unit of a physical quantity are
- It should be possible to define the unit without ambiguity.
- The unit should be reproducible.
- The value of units should not change with space and time.
Solution 4S.
Definitions of three fundamental quantities:
- S.I. unit of length (m): A metre was originally defined in 1889 as the distance between two marks drawn on a platinum-iridium (an alloy made of 90% platinum and 10% iridium) rod kept at 0°C in the International Bureau of Weights and Measures at serves near Paris.
- S.I. unit of mass (kg): In 1889, one kilogramme was defined as the mass of a cylindrical piece of a platinum-iridium alloy kept at International Bureau of Weights and Measures at serves near Paris.
- S.I. unit of time (s): A second is defined as 1/86400th part of a mean solar day, i.e.

Solution 5S.
Three systems of unit and their fundamental units:
- C.G.S. system (or French system): In this system, the unit of length is centimeter (cm), unit of mass is gramme (g) and unit of time is second (s).
- F.P.S. system (or British system): In this system, the unit of length is foot (ft), unit of mass is pound (lb) and unit of time is second (s).
- M.K.S. system (or metric system): In this system, the unit of length is metre (m), unit of mass is kilogramme (kg) and unit of time is second (s).
Solution 6S.
A fundamental (or basic) unit is that which is independent of any other unit or which can neither be changed nor can be related to any other fundamental unit.
Solution 7S.
Fundamental quantities, units and symbols in S.I. system are
| Quantity | Unit | Symbol |
| Length | metre | m |
| Mass | kilogramme | kg |
| Time | second | s |
| Temperature | kelvin | K |
| Luminous intensity | candela | cd |
| Electric current | ampere | A |
| Amount of substance | mole | mol |
| Angle | radian | rd |
| Solid angle | steradian | st-rd |
Solution 8S.
The units of quantities other than those measured in fundamental units can be obtained in terms of the fundamental units, and thus the units so obtained are called derived units.
Example:
Speed = Distance/time
Hence, the unit of speed = fundamental unit of distance/fundamental unit of time
Or, the unit of speed = metre/second or ms-1.
As the unit of speed is derived from the fundamental units of distance and time, it is a derived unit.
Solution 9S.
A metre was originally defined in 1889 as the distance between two marks drawn on a platinum-iridium (an alloy with 90% platinum and 10% iridium) rod kept at 0o C in the International Bureau of Weights and Measures at serves near Paris.
Solution 10S.
Astronomical unit (A.U.) and kilometer (km) are units of length which are bigger than a metre.
1 km = 1000 m
1 A.U. = 1.496 × 10¹¹ m
Solution 11S.
Centimeter (cm) and millimeter (mm) are units of length smaller than a metre.
1 cm = 10-2 m
1 mm = 10-3 m
Solution 12S.
1 nm = 10 Å
Solution 13S.
Three convenient units of length and their relation with the S.I. unit of length:
- 1 Angstrom (Å) = 10-10 m
- 1 kilometre (km) = 103 m
- 1 light year (ly) = 9.46 × 10¹⁵ m
Solution 14S.
S.I. unit of mass is ‘kilogramme’.
In 1889, one kilogramme was defined as the mass of a cylindrical piece of a platinum-iridium alloy kept at the International Bureau of Weights and Measures at serves near Paris.
Solution 15S.
(a) 1 light year = 9.46 × 10¹⁵ m
(b) 1 m = 1010 Å
(c) 1 m = 106 µ (micron)
(d) 1 micron = 104 Å
(e) 1 fermi = 10-15 m
Solution 16S.
The units ‘gramme’ (g) and ‘milligramme’ (mg) are two units of mass smaller than ‘kilogramme’.
1 g = 10-3 kg
1 mg = 10-6 kg
Solution 17S.
The units ‘quintal’ and ‘metric tonne’ are two units of mass bigger than ‘kilogramme’.
1 quintal = 100 kg
1 metric tonne = 1000 kg
Solution 18S.
(a) 1 g = 10-3 kg
(b) 1 mg = 10-6 kg
(c) 1 quintal = 100 kg
(d) 1 a.m.u (or u) = 1.66 x 10⁻²⁷ kg
Solution 19S.
The S.I. unit of time is second (s).
A second is defined as 1/86400th part of a mean solar day, i.e.

Solution 20S.
The units ‘minute’ (min) and ‘year’ (yr) are two units of time bigger than second(s).
1 min = 60 s
1 yr = 3.1536 × 10⁷ s
Solution 21S.
A leap year is the year in which the month of February has 29 days.
Solution 22S.
Yes, the given statement is true.
Solution 23S.
One lunar month is the time in which the moon completes one revolution around the earth. A lunar month is made of nearly 4 weeks.
Solution 24S.
(a) 1 nanosecond = 10-9 s
(b) 1 µs = 10-6 s
(c) 1 mean solar day = 86400 s
(d) 1 year = 3.15 × 10⁷ s
Solution 25S.
(a) Mass (b) Distance (or length) (c) Time (d) Length
Solution 26S.
(a) ms-1 (b) kg ms-2 (c) kg m2s-2 (d) kg m-1s-2
Solution 27S.
(a) kg ms-2 (b) kg m2s-3
(c) kg m2s-2 (d) kg m-1s-2
Solution 28S.
(a) Area (b) Force (c) Energy
(d) Pressure (f) Power
Solution 1M.
Second
Solution 2M.
Litre
Solution 3M.
Leap year
Solution 4M.
0.1 nm
Solution 5M.
Length
Solution 1N.
Wavelength of light of particular colour = 5800 Å
(a) (i) 1 Å = 10-1 nm
5800 Å = 5800 × 10-1 nm
= 580 nm
(ii) 1 Å = 10-10 m
5800 Å = 5800 × 10-10 m
= 5.8 × 10⁻⁷ m
(b) The order of its magnitude in metre is 10-6 m because the numerical value of 5.8 is more than 3.2.
Solution 2N.
Size of a bacteria = 1 µ
Since 1 µ = 10-6 m
Number of the particle = Total length/size of
one bacteria
= 1 m/10-6 m
= 106
Solution 3N.
Distance of galaxy = 5.6 × 1025 m
Speed of light = 3 × 10⁸ m/s
(a) Time taken by light = Distance travelled/speed of light
= (5.6 × 1025 / 3 × 10⁸) s
= 1.87 × 10¹⁷ s
(b) Order of magnitude = 100 × 1017 s = 1017 s
(This is because the numerical value of 1.87 is less than the numerical value 3.2)
Solution 4N.
Wavelength of light = 589 nm
= 589 × 10-9 m
= 5.89 × 10⁻⁷ m
Order of magnitude = 101 × 10-7 m
= 10-6 m
(This is because the numerical value of 5.89 is more than the numerical value 3.2)
Solution 5N.
Mass of an oxygen atom = 16.00 u
Now, 1 u = 1.66 × 10⁻²⁷ kg
Hence, mass of oxygen in kg = 16 × 1.66 × 10-27 kg
= 26.56 × 10⁻²⁷ kg
Because the numerical value of 26.56 is greater than the numerical value of 3.2, the order of magnitude of mass of oxygen in kg
= 101 × 10-27 kg
= 10-26 kg
Solution 6N.
Time taken by light to reach from the Sun to the Earth = 8 min = 480 s.
Speed of light = 3 × 10⁸ m/s
Distance from the Sun to the Earth = Speed × time
= 3 × 108 × 480 m
= 1440 × 108 m
= 1440 × 108 × 10-3 km
= 1440 × 105 km
= 1.44 × 10⁸ km
Because the numerical value of 1.44 is less than the numerical value of 3.2, the order of magnitude of distance from the Sun to the Earth in km = 100 × 108 km
= 108 km
Solution 7N.
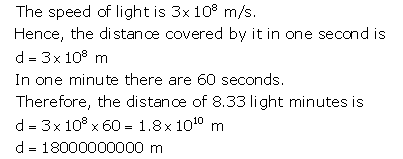
The statement ‘the distance of a star from the Earth is 8.33 light minutes’ means that the light from the star takes 8.33 minutes to reach Earth.
Exercise 1(B)
Solution 1S.
The least count of an instrument is the smallest measurement that can be taken accurately with it. For example, if an ammeter has 5 divisions between the marks 0 and 1A, then its least count is 1/5 = 0.2 A or it can measure current up to the value 0.2 accurately.
Solution 2S.
Total length of the scale = 1 m = 100 cm
No. of divisions = 100
Length of each division = Total length/total no. of divisions
= 100 cm/100
= 1 cm
Thus, this scale can measure with an accuracy of 1 cm.
To increase the accuracy, the total number of divisions on the scale must be increased.
Solution 3S.
The least count of a metre rule is 1 cm.
The length cannot be expressed as 2.60 cm because a metre scale measures length correctly only up to one decimal place of a centimeter.
Solution 4S.
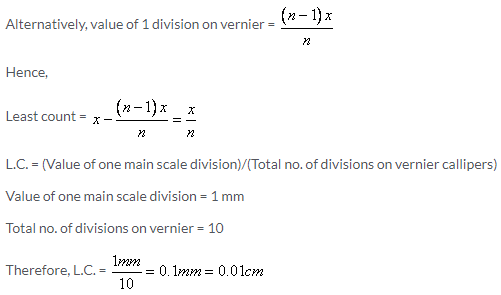
The least count of vernier callipers is equal to the difference between the values of one main scale division and one vernier scale division.
Let n divisions on vernier callipers be of length equal to that of (n – 1) divisions on the main scale and the value of 1 main scale division be x. Then,
Value of n divisions on vernier = (n – 1) x
Solution 5S.
Vernier constant is equal to the difference between the values of one main scale division and one vernier scale division. It is the least count of vernier callipers.
Solution 6S.
A vernier calipers is said to be free from zero error, if the zero mark of the vernier scale coincides with the zero mark of the main scale.
Solution 7S.
Due to mechanical errors, sometimes the zero mark of the vernier scale does not coincide with the zero mark of the main scale, the vernier callipers is said to have zero error.
It is determined by measuring the distance between the zero mark of the main scale and the zero mark of the vernier scale.
The zero error is of two kinds
- Positive zero error
- Negative zero error
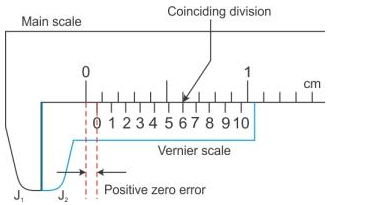
1. Positive zero error: On bringing the two jaws together, if the zero mark of the vernier scale is on the right of the zero mark of the main scale, the error is said to be positive.
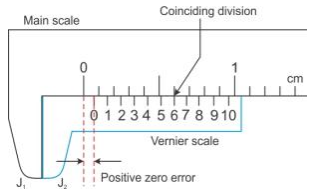
To find this error, we note the division of the vernier scale, which coincides with any division of the main scale. The number of this vernier division when multiplied by the least count of the vernier callipers, gives the zero error.
For example, for the scales shown, the least count is 0.01 cm and the 6th division of the vernier scale coincides with a main scale division.
Zero error = +6 × L.C. = +6 × 0.01 cm
= +0.06 cm
2. Negative zero error: On bringing the two jaws together, if the zero mark of the vernier scale is on the left of the zero mark of the main scale, then the error is said to be negative.
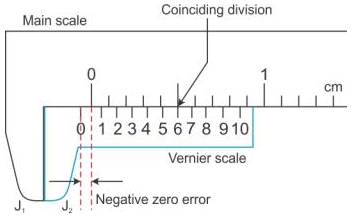
To find this error, we note the division of the vernier scale coinciding with any division of the main scale. The number of this vernier division is subtracted from the total number of divisions on the vernier scale and then the difference is multiplied by the least count.
For example, for the scales shown, the least count is 0.01 cm and the sixth division of the vernier scale coincides with a certain division of the main scale. The total number of divisions on vernier callipers is 10.
Zero error = – (10 – 6) × L.C.
= – 4 × 0.01 cm = – 0.04 cm
Correction:
To get correct measurement with vernier callipers having a zero error, the zero error with its proper sign is always subtracted from the observed reading.
Correct reading = Observed reading – zero error (with sign)
Solution 8S.
Solution 9S.
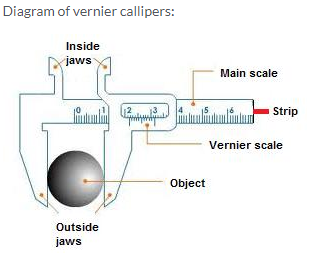
Main parts and their functions:
- Main scale: It is used to measure length correct up to 1 mm.
- Vernier scale: It helps to measure length correct up to 0.1 mm.
- Outside jaws: It helps to measure length of a rod, diameter of a sphere, external diameter of a hollow cylinder.
- Inside jaws: It helps to measure the internal diameter of a hollow cylinder or pipe.
- Strip: It helps to measure the depth of a beaker or a bottle.
Solution 10S.
Three uses of vernier callipers are
- Measuring the internal diameter of a tube or a cylinder.
- Measuring the length of an object.
- Measuring the depth of a beaker or a bottle.
Solution 11S.
Two scales of vernier calipers are
- Main scale
- Vernier scale
The main scale is graduated to read up to 1 mm and on vernier scale, the length of 10 divisions is equal to the length of 9 divisions on the main scale.
Value of 1 division on the main scale= 1 mm
Total no. of divisions on the vernier scale = 10
Thus, L.C. = 1 mm /10 = 0.1 mm = 0.01 cm.
Hence, a vernier callipers can measure length correct up to 0.01 cm.
Solution 12S.
Measuring the length of a small rod using vernier calipers:
The rod whose length is to be measured is placed in between the fixed end and the vernier scale as shown in the figure.
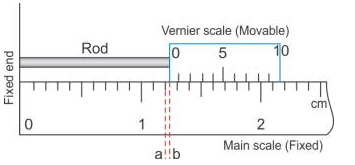
In this position, the zero mark of the vernier scale is ahead of 1.2 cm mark on main scale. Thus the actual length of the rod is 1.2 cm plus the length ab (i.e., the length between the 1.2 cm mark on the main scale and 0 mark on vernier scale).
To measure the length ab, we note the pth division of the vernier scale, which coincides with any division of main scale.
Now, ab + length of p divisions on vernier scale = length of p divisions on main scale
Alternatively, ab = length of p divisions on the main scale – length of p divisions on the vernier scale.
= p (length of 1 division on main scale – length of 1 division on vernier scale)
= p × L.C.
Therefore, total reading = main scale reading + vernier scale reading
= 1.2 cm + (p × L.C.)
Solution 13S.
(a) Outside jaws
(b) Inside jaws
(c) Strip
(d) Outer jaws
Solution 14S.
(i) Pitch: The pitch of a screw gauge is the distance moved by the screw along its axis in one complete rotation.
(ii) Least count (L.C.) of a screw gauge: The L.C. of a screw gauge is the distance moved by it in rotating the circular scale by one division.
Thus, L.C. = Pitch of the screw gauge/total no. of divisions on its circular scale.
If a screw moves by 1 mm in one rotation and it has 100 divisions on its circular scale, then pitch of screw = 1 mm.
Thus, L.C. = 1 mm / 100 = 0.01 mm = 0.001 cm
Solution 15S.
The least count of a screw gauge can be increased by decreasing the pitch and increasing the total number of divisions on the circular scale.
Solution 16S.
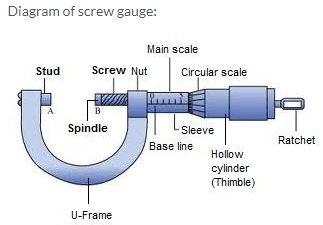
Main parts and their functions:
- Ratchet:It advances the screw by turning it until the object is gently held between the stud and spindle of screw.
- Sleeve:It marks the main scale and base line.
- Thimble:It marks the circular scale.
- Main scale:It helps to read the length correct up to 1 mm.
- Circular scale:It helps to read length correct up to 0.01 mm.
Solution 17S.
A screw gauge is used for measuring diameter of circular objects mostly wires with an accuracy of 0.001 cm.
Solution 18S.
Ratchet helps to advance the screw by turning it until the object is gently held between the stud and spindle of the screw.
Solution 19S.
Due to mechanical errors, sometimes when the anvil and spindle end are brought in contact, the zero mark of the circular scale does not coincide with the base line of main scale. It is either above or below the base line of the main scale, in which case the screw gauge is said to have a zero error. It can be both positive and negative.
It is accounted by subtracting the zero error (with sign) from the observed reading in order to get the correct reading.
Correct reading = Observed reading – zero error (with sign)
Solution 20S.
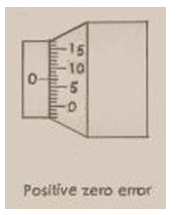
Diagram of a screw gauge with L.C. 0.001 cm and zero error +0.007 cm.
Solution 21S.
Backlash error: If by reversing the direction of rotation of the thimble, the tip of the screw does not start moving in the opposite direction immediately but remains stationary for a part of rotation; it is called backlash error.
Reason: It happens due to wear and tear of the screw threads.
To avoid the backlash error, while taking the measurements the screw should be rotated in one direction only. If the direction of rotation of the screw needs to be changed, then it should be stopped for a while and then rotated in the reverse direction.
Solution 22S.
Measurement of diameter of wire with a screw gauge:
The wire whose thickness is to be determined is placed between the anvil and spindle end, the thimble is rotated until the wire is firmly held between the anvil and spindle. The rachet is provided to avoid excessive pressure on the wire. It prevents the spindle from further movement. The thickness of the wire could be determined from the reading as shown in the figure below.
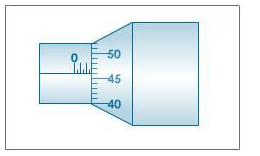
The pitch of the screw = 1 mm
L.C. of screw gauge = 0.01 mm
Main scale reading = 2.5 mm
46th division of circular scale coincides with the base line.
Therefore, circular scale reading = 46 × 0.01 = 0.46 mm
Total reading = Main scale reading + circular scale reading
= (2.5 + 0.46) mm
= 2.96 mm
Solution 23S.
(a) Screw gauge
(b) Screw gauge
(c) Vernier calipers
(d) Screw gauge
Solution 24S.
Screw gauge measures a length to a high accuracy.
Solution 25S.
(a) Vernier callipers (b) Metre scale (c) Screw gauge.
Solution 1M.
The least count of a vernier calipers is 0.01 cm
Solution 2M.
0.002 cm
Solution 3M.
A screw gauge
Solution 1N.
Range of the stop watch = 5s
Total number of divisions = 10
L.C. = 5/10 = 0.5 s
Solution 2N.
Value of 1 m.s.d. = 1 mm
10 vernier divisions = 9 m.s.d.
L.C. = Value of 1 m.s.d./number of divisions on vernier scale
= 1 mm/10
= 0.1 mm or 0.01 cm
Solution 3N.
There are 20 divisions in 1 cm on the main scale.
Therefore, the value of 1 m.s.d. (x) = 1/20 cm = 0.05 cm
No. of divisions on the vernier scale (n) = 25
Hence, the L.C. of the microscope = x/n = (0.05 / 25) cm
= 0.002 cm
Solution 4N.
Thickness of the pencil (observed reading) = 1.4 mm
Zero error = + 0.02 cm = + 0.2 mm
Correct reading = observed reading – zero error (with sign)
= 1.4 mm – 0.2 mm
= 1.2 mm
Solution 5N.
(i) Value of 1 m.s.d. =1 mm
10 vernier divisions = 9 m.s.d.
L.C. = Value of 1 m.s.d./number of divisions on the vernier scale
= 1 mm/10
= 0.1 mm or 0.01 cm
(ii) On bringing the jaws together, the zero of the vernier scale is ahead of zero of the main scale, the error is positive.
3rd vernier division coincides with a main scale division.
Total no. of vernier divisions = 10
Zero error = +3 × L.C.
= +3 × 0.01 cm
= +0.03 cm
Solution 6N.
(i) Value of 1 m.s.d = 1 mm = 0.1 cm
20 vernier divisions = 19 m.s.d.
L.C. = Value of 1 m.s.d./number of divisions on the vernier scale
= 1mm/20
= (0.1/20) cm
= 0.005 cm
(ii) Main scale reading = 35 mm = 3.5 cm
Since 4th division of the main scale coincides with the main scale, i.e. p = 4.
Therefore, the vernier scale reading = 4 × 0.005 cm = 0.02 cm
Total reading = Main scale reading + vernier scale reading
= (3.5 + 0.02) cm
= 3.52 cm
Radius of the cylinder = Diameter (Total reading) / 2
= (3.52/2) cm
= 1.76 cm
Solution 7N.
(a) L.C. of vernier callipers = 0.01 cm
Main scale reading = 1.8 cm
Since 4th division of the main scale coincides with the main scale, i.e. p = 4.
Therefore, the vernier scale reading = 4 × 0.01 cm = 0.04 cm
Total reading = Main scale reading + vernier scale reading
= (1.8 + 0.04) cm
= 1.84 cm
(b) Observed reading = 1.84 cm
Zero error = -0.02 cm
Correct reading = Observed reading – Zero error (with sign)
= [1.84 – (-0.02)] cm
= 1.86 cm
Solution 8N.
L.C. of vernier callipers = 0.01 cm
In the shown scale,
Main scale reading = 3.3 mm
6th vernier division coincides with an m.s.d.
Therefore, vernier scale reading = 6 × 0.01 cm = 0.06 cm
Total reading = m.s.r. + v.s.r.
= 3.3 + 0.06
= 3.36 cm
Solution 9N.
Pitch of a screw gauge = 0.5 mm
No. of divisions on the circular scale = 100
L.C. = (0.5/100) mm
= 0.005 mm or 0.0005 cm
Solution 10N.
No. of divisions on the circular scale = 50
(i) Pitch = Distance moved ahead in one revolution
= 1 mm/2 = 0.5 mm
(ii) L.C. = Pitch/No. of divisions on the circular head
= (0.5/50) mm
= 0.01 mm
Solution 11N.
Pitch of the screw gauge = 1mm
No. of divisions on the circular scale = 100
(i) L.C. = Pitch/No. of divisions on the circular head
= (1/100) mm
= 0.01 mm or 0.001 cm
(ii) Main scale reading = 2mm = 0.2 cm
No. of division of circular head in line with the base line (p) = 45
Circular scale reading = (p) × L.C.
= 45 x 0.001 cm
= 0.045 cm
Total reading = M.s.r. + circular scale reading
= (0.2 + 0.045) cm
= 0.245 cm
Solution 12N.
(i) L.C. of screw gauge = 0.01 mm or 0.001 cm
Main scale reading = 1 mm or 0.1 cm
No. of division of circular head in line with the base line (p) = 27
Circular scale reading = (p) × L.C.
= 27 × 0.001 cm
= 0.027 cm
Diameter (Total reading) = M.s.r. + circular scale reading
= (0.1 + 0.027) cm
= 0.127 cm
(ii) Zero error = 0.005 cm
Correct reading = Observed reading – zero error (with sign)
= [0.127 – (+0.005)] cm
= 0.122 cm
Solution 13N.
No. of divisions on the circular scale = 50
(i) Pitch = Distance moved ahead in one revolution
= 1 mm/2 = 0.5 mm
(ii) L.C. = Pitch/No. of divisions on the circular head
= (0.5/50) mm
= 0.01 mm
(iii) Because the zero of the circular scale lies below the base line, when the flat end of the screw is in contact with the stud, the error is positive.
No. of circular division coinciding with m.s.d. = 4
Zero error = + (4 × L.C.)
= + (4 × 0.01) mm
= + 0.04 mm
Solution 14N.
No. of divisions on the circular scale = 50
(i) Pitch = Distance moved ahead in one revolution
= 1 mm/1 = 1 mm.
(ii) L.C. = Pitch/No. of divisions on the circular head
= (1/50) mm
= 0.02 mm
(iii) Main scale reading = 4 mm
No. of circular division coinciding with m.s.d. (p) = 47
Circular scale reading = p × L.C.
= (47 × 0.02) mm
= 0.94 mm
Diameter (Total reading) = M.s.r. + circular scale reading
= (4 + 0.94) mm
= 4.94 mm
Solution 15N.
Pitch of the screw gauge = 0.5 mm
L.C. of the screw gauge = 0.001 mm
No. of divisions on circular scale = Pitch / L.C.
= 0.5 / 0.001
= 500
Exercise 1(C)
Solution 1S.
A simple pendulum is a heavy point mass (known as bob) suspended from a rigid support by a massless and inextensible string.
No, the pendulum used in pendulum clock is not a simple pendulum because the simple pendulum is an ideal case. We cannot have a heavy mass having the size of a point and string having no mass.
Solution 2S.
(i) Oscillation: One complete to and fro motion of the pendulum is called one oscillation.
(ii) Amplitude: The maximum displacement of the bob from its mean position on either side is called the amplitude of oscillation. It is measured in metres (m).
(iii) Frequency: It is the number of oscillations made in one second. Its unit is hertz (Hz).
(iv)Time period: This is the time taken to complete one oscillation. It is measured in second (s).
Solution 3S.
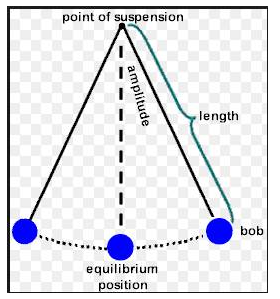
Simple Pendulum:
Solution 4S.
Two factors on which the time period of a simple pendulum depends are
- Length of pendulum (l)
- Acceleration due to gravity (g)

Solution 5S.
Two factors on which the time period of a simple pendulum does not depend are
- Material of the bob
- Amplitude
Solution 6S.
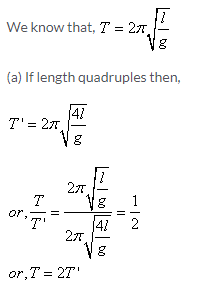
Therefore, the time period is doubled.
(b) If the acceleration due to gravity is reduced to one-fourth,
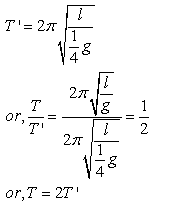
Therefore, the time period is doubled.
Solution 7S.

Solution 8S.
Measurement of time period of a simple pendulum:
- To measure the time period of a simple pendulum, the bob is slightly displaced from its mean position and is then released. This gives a to and fro motion about the mean position to the pendulum.
- The time ‘t’ for 20 complete oscillations is measured with the help of a stop watch.
- Time period ‘T’ can be found by dividing ‘t’ by 20.
To find the time period, the time for the number of oscillations more than 1 is noted because the least count of stop watch is either 1 s or 0.5 s. It cannot record the time period in fractions such as 1.2 or 1.4 and so on.
Solution 9S.
The time period of a simple pendulum is directly proportional to the square root of its effective length.
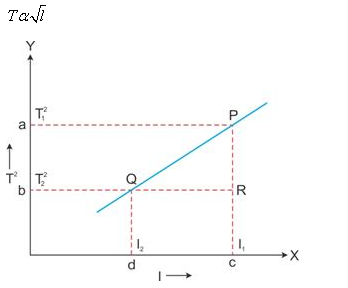
From this graph, the value of acceleration due to gravity (g) can be calculated as follows.
The slope of the straight line can be found by taking two points P and Q on the straight line and drawing normals from these points on the X- and Y-axis, respectively. Then, the value of T2 is to be noted at a and b, the value of l at c and d. Then,

where g is the acceleration due to gravity at that place. Thus, g can be determined at a place from these measurements using the following relation:

Solution 10S.
The ratio of their time periods would be 1:1 because the time period does not depend on the weight of the bob.
Solution 11S.
Pendulum A will take more time (twice) in a given time because the time period of oscillation is directly proportional to the square root of the length of the pendulum. Therefore, the pendulum B will have a greater time period and thus making lesser oscillations.
Solution 12S.
(a) The time period of oscillations is directly proportional to the square root of the length of the pendulum.
(b) The time period of oscillations of simple pendulum does not depend on the mass of the bob.
(c) The time period of oscillations of simple pendulum does not depend on the amplitude of oscillations.
(d) The time period of oscillations of simple pendulum is inversely proportional to the square root of acceleration due to gravity.
Solution 13S.
A pendulum with the time period of oscillation equal to two seconds is known as a seconds pendulum.
Solution 14S.
The frequency of oscillation of a seconds’ pendulum is 0.5 s-1. It does not depend on the amplitude of oscillation.
Solution 1M.
Half
Solution 2M.
2 s
Solution 3M.
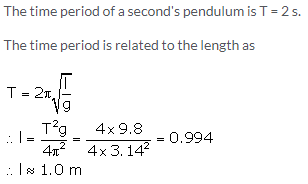
Solution 1N.
(a) Frequency = Oscillations per second
= (40/60) s-1
= 0.67 s-1
(b) Time period = 1/frequency
= (1/0.67) s
= 1.5 s
Solution 2N.
Time period = 2 s
Frequency = 1/time period
= (½)s-1
= 0.5 s-1
Such a pendulum is called the seconds’ pendulum.
Solution 3N.
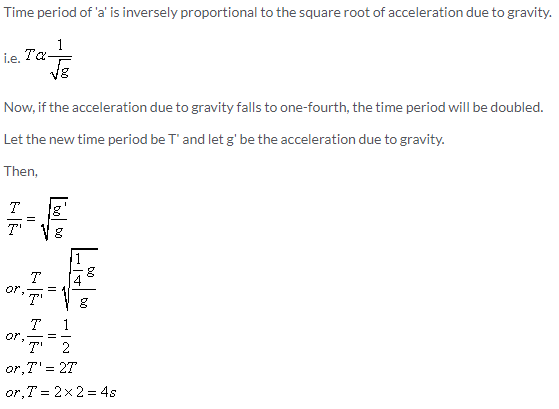
Solution 4N.
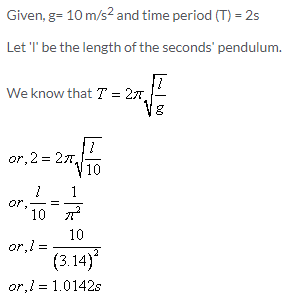
Solution 5N.
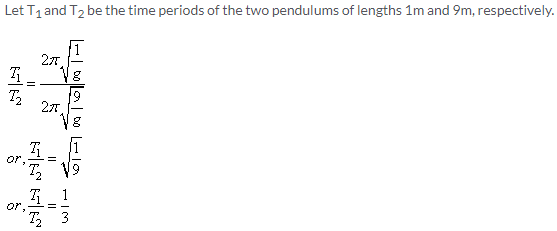
Solution 6N.
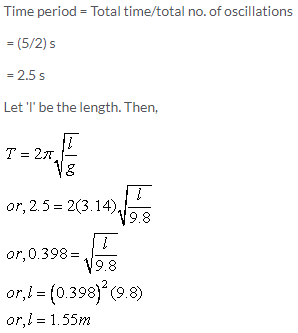
Solution 7N.
Let T1 and T2 be the time periods of the two pendulums of lengths l1 and l2, respectively.
Then, we know that the time period is directly proportional to the square root of the length of the pendulum.
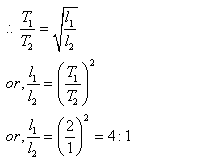
Solution 8N.
Time period = Time taken to complete 1 oscillation
= (4 × 0.2) s
= 0.8 s
Solution 9N.
Time period of a seconds’ pendulum = 2 s
Time taken to complete half oscillation, i.e. from one extreme to the other extreme = 1 s.
More Resources for Selina Concise Class 9 ICSE Solutions
- Concise Physics Class 9 ICSE Solutions
- Concise Chemistry Class 9 ICSE Solutions
- Concise Biology Class 9 ICSE Solutions
- Concise Mathematics Class 9 ICSE Solutions
