Kerala Plus One Physics Notes Chapter 2 Units and Measurement
Summary
Introduction
a. Fundamental or base quantities:
Physics is based on measurement of physical quantities. Certain physical quantities are chosen as fundamental or base quantities. Length, mass, time, electric current thermodynamic temperature, amount of substance and luminous intensity are such base quantities.
b. Units: Fundamental Units and Derived Units Unit:
Measurement of any physical quantity is made by comparing it with a standard. Such standard of measurement are known as unit. If length of rod is 5 m, it means that the length of rod is 5 times the standard unit ‘metre’.
Fundamental Unit:
The unit of fundamental or base quantities are called fundamental or base units. The base units are listed in table.
| Base quantity | Base unit |
| Length | Metre |
| Mass | kilogram |
| Time | Second |
| Electric current | Ampere |
| Thermodynamic Temperature | Kelvin |
| Amount of Substance | mole |
| Luminous Intensity | Candela |
Derived Unit
The units of other physical quantities can be expressed as combination of base units. Such units are called derived units.
Example: Unit of force is kgms-2 (or Newton). Unit of velocity is ms-1.
The International System Of UnitsDerived Unit
System of Units: A complete set of fundamental and derived units is called a system of unit.
a. Different system of units:
The different systems of units are CGS system FPS (or British) system, MKS system and SI system. A comparison of these systems of unit is given in the table below, (for length, mass and time)
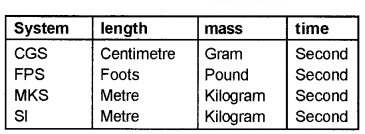
Note: The first three systems of units were used in earlier time. Presently we use SI system.
b. International System Of Unit (Si Unit):
The internationally accepted system of unit for measurement is system international d’ unites (French for International System of Units). It is abbreviated as SI.
The SI system is based on seven fundamental units and these units have well defined and internationally accepted symbols, (given in table – 2.1)
c. Solid Angle and Plane Angle:
Other than the seven base units, two more units are defined.
1. Plane angle (dq): It is defined as ratio of length of arc (ds) to the radius, r.

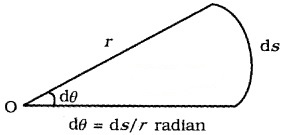
The unit of plane angle is radian. Its symbol is rad.
2. Solid Angle (dW): It is defined as the ratio of the intercepted area (dA) of spherical surface, to square of its radius.

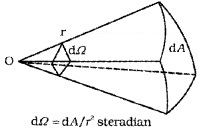
The unit of solid angle is steradian. The symbol is Sr.
Measurement Of Length
Two methods are used to measure length
- direct method
- indirect method.
The metre scale, Vernier caliper, screwgauge, spherometer are used in direct method for measurement of length. The indirect method is used if range of length is beyond the above ranges.
1. Measurement Of Large Distances:
Parallax Method:
Parallax method is used to find distance of planet or star from earth. The distance between two points of observation (observatories) is called base. The angle between two directions of observation at the two points is called parallax angle or parallactic angle (q).
Parallax Method
The planet ‘s’ is at a distance ‘D’ from the surface of earth. To measure D, the planet is observed from two observatories A and B (on earth). The distance between A and B is b and q be the parallax angle between direction of observation from A and B.
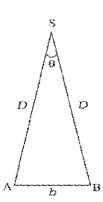
AB can be considered as an arch A h B of length ‘b’ of a circle of radius D with its center at S. (Because q is very small, \(\frac{b}{D}\)<<1], Thus from arch-radius relation.

Thus by measuring b and q distance to planet can be determined. The size of planet or angular diameter of planet can be measured using the value of D. If the angle a (angle between two directions of observation of two diametrically opposite points on planet) is measured using a

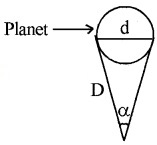
Where d is diameter of planet.
2. Estimation Of Very Small Distances:
Size Of Molecule
Electron microscope can measure distance of the order of 0.6A0 (wavelength of electron).
3. Range Of Lengths:
The size of the objects in the universe vary over a very wide range. The table (given below) gives the range and order of lengths and sizes of some objects in the universe.
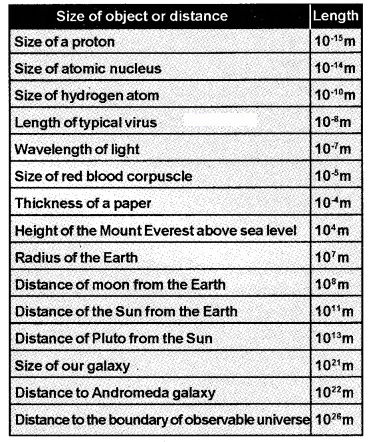
Units for short and large lengths
1 fermi = 1f = 10-15m
1 Angstrom = 1A° = 10-10m
1 astronomical unit = 1AU = 1.496 × 10¹¹m
1 light year = 1/y = 9.46 × 10¹⁵m
(Distance that light travels with velocity of 3 × 10⁸ m/s in 1 year)
1 par sec = 3.08 × 10¹⁶m = 3.3 light year
(par sec is the distance at which average radius of earth’s orbit subtends an angle of 1 arc second).
Measurement Of Mass
Mass is basic property of matter. The S.l. unit of mass is kg. While dealing with atoms and molecules, the kilogram •is an inconvenient unit. In this case there is an important standard unit called the unified atomic mass unit( u).
1 unified atomic mass unit = lu
= (1/12)th of the mass of carbon-12
1. Range Of Masses:
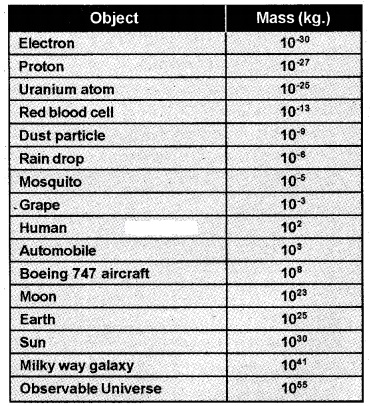
The masses of the objects in the universe vary over a very wide range which is given in the table.
Measurement Of Time
To measure any time interval we need a clock. We now use an atomic standard of time, which is based on the periodic vibrations produced in a cesium atom. This is the basis of the cesium clock sometimes called atomic clock.
Definition of second:
One second was defined as the duration of 9, 192, 631, 770 internal oscillations between two hyperfine levels of Cesium-133 atom in the ground state.
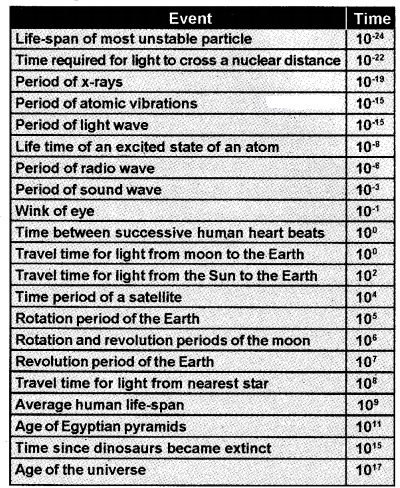
Range and Order of time intervals
Accuracy, Precision Of Instruments And Errors In Measurement
Error:
The result of every measurement by any measuring instrument contains some uncertainty. This uncertainty is called error.
Systematic errors:
Systematic errors are those errors that tend to be in one direction, either positive or negative.
Sources of systematic errors
- Instrumental errors
- Imperfection in experimental technique or procedure
- personal errors
1. Instrumental errors:
Instrumental error arise from the errors due to imperfect design or calibration of the measuring instrument.
eg: In Vernier Callipers, the zero mark of vernier scale may not coincide with the zero mark of the main scale.
2. Imperfection in experimental technique or procedure:
To determine the temperature of a human body, a thermometer placed under the armpit will always give a temperature lower than the actual value of the body temperature. Other external conditions (such as changes in temperature, humidity, velocity……..etc) during the experiment may affect the measurement.
3. Personal Errors:
Personal error arise due to an individual’s bias, lack of proper setting of the apparatus or individual carelessness etc.
Random errors
The random errors are those errors, which occur irregularly and hence are random with respect to sign and size. These can arise due to random and unpredictable fluctuations in experimental conditions (eg. unpredictable fluctuations in temperature, voltage supply, etc.)
Least Count Error
The smallest value that can be measured by the measuring instrument is called its least count. The least count error is the error associated with the resolution of the instrument. By using instruments of higher precision, improving experimental technique etc, we can reduce least count error.
1. Absolute Error, Relative Error And Percentage Error:
The magnitude of the difference between the true value of the quantity and the measured value is called absolute error in the measurement. Since the true value of the quantity is not known, the arithmetic mean of the measured values may be taken as the true value.
Explanation:
Suppose the values obtained in several measurements are a1, a2, a3,………,an. Then arithmetic mean can be written as

The absolute error,
∆a1 = amean – a1
∆a2 = amean – a2
∆an = amean – an
a. Mean absolute error:
The arithmetic mean of all the absolute errors is known as mean absolute error. The mean absolute error in the above case,

b. Relative error:
The relative error is the ratio of the mean absolute error (Damean) to the mean value (amean).

c. Percentage error:
The relative error expressed in percent is called the percentage error (da).

Example:
Question 1.
When the diameter of a wire is measured using a screw gauge, the successive readings are found to be 1.11 mm, 1.14mm, 1.09mm, 1.15 mm, and 1.16 mm. Calculate the absolute error and relative error in the measurement.
Answer:
The arithmetic mean value of the measurement is
![]()
The absolute errors in the measurements are
1.13 – 1.14 = 0.02mm
1.13 – 1.14 = -0.01mm
1.13 – 1.09 = 0.04mm
1.13 – 1.15 =-0.02 mm
1.13 – 1.16 = 0.03mm
The arithmetic mean of the absolute errors

Percentage of relative error

2. Combination Of Errors:
When a quantity is determined by combining several measurements, the errors in the different measurements will combine in some way or other.
a. Error of a sum or a difference:
Rule: when two quantities are added or subtracted, the absolute error in the final result is the sum of the absolute errors in the individual quantities.
Explanation:
Let two quantities A and B have measured values A ± DA and B ± DB respectively. DA and DB are the absolute errors in their measurements. To find the error Dz that may occur in the sum z = A + B,
Consider
z + ∆z = (A ± ∆A) + B ± ∆B = (A + B) ± ∆A ± ∆B
The maximum possible error in the value of z is given by,
![]()
Similarly, it can be shown that, the maximum error in the difference.
Z = A – B is also given by
![]()
b. Error of product ora quotient:
Rule: When two quantities are multiplied or divided, the relative error in the result is the sum of the relative errors in the multipliers.
Explanation:
Suppose Z=AB and the measured values of A and B are A + DA and B + DB. They
Z + DZ = (A + DA) (B + DB)
= AB ± BDA ± ADB ± DADB
Dividing LHS by Z and RHS by AB, we get

c. Errors in case of a measured quantity raised to a power:
Suppose Z = A2

Hence, the relative error in A2 is two time the error in A.
In general, if \(Z=\frac{A^{P} B^{q}}{C^{T}}\)
Then

Hence the rule: The relative error in a physical quantity raised to the power K is the K times the relative error in the individual quantity.
Significant Figures
Every measurement involves errors. Hence the result of measurement should be reported in a way that indicates the precision of measurement.
Normally, the reported result of measurement is a number that includes all digits in the number that are known reliable plus the first digit that is uncertain. The reliable digits plus the first uncertain digit are known as significant digits or significant figures.
Example:
- The length of a rod measured is 3.52cm. Here there are 3 significant figures. The digits 3 and 5 are reliable and the last digit 2 is uncertain.
- The mass of a body measured as 3.407g. Here there are four significant figures. The figure 7 is uncertain.
When the measurement becomes more accurate, the number of significant figure is increased.
Rules to find significant figures:
1. All the non zero digits are significant.
Example:
Question 1.
Find significant figure of
- 2500
- 263.25
Answer:
- In this case, there are two nonzero numbers. Hence significant figure is 2.
- In this, there are 5 nonzero numbers. Hence significant figure is 5.
2. All the zeros between two nonzero digits are significant, no matter where the decimal point is,
Example:
Question 2.
Find the significant figure
- 2.05
- 302.005
- 2000145
Answer:
- Significant figure is 3
- Significant figure is 6
- Significant figure is 7
3. If the number is less than 1, the zeros on the right of decimal point but to the left to the first nonzero digits are not significant.
Example:
Question 1.
Find the significant figure of
- 0.002308
- 0.000135
Answer:
- 4 significant figures
- 3 significant figures
4. The terminal zeros in a number without a deci¬mal point are not significant.
Example:
Question 1.
Find the significant figure of
- 12300
- 60700
Answer:
- 3
- 3
Note: But if the number obtained is on the basis of actual measurement, all zeros to the right of last non zero digit are significant.
Example: If distance is measured by a scale as 2010m. This contain 4 significant figures.
5. The terminal zeros in a number with a decimal point are significant.
Example:
Question 1.
Find the significant figure of
- 3.500
- 0.06900
- 4.7000
Answer:
- 4
- 4
- 5
Method to find significant figures through scientific notation:
In this notation, every number is expressed as a × 10b, where a is a number between 1 and 10 and b is any positive or negative power. In this method, we write the decimal after the first digit.
Example:
4700m =4.700 × 10³m
The power of 10 is irrelevant to the determination of significant figures. But all zeros appearing in the base number in the scientific notation are significant. Hence each number in this case has 4 significant figures.
Significant figures in numbers:-
| Numbers | Significant figures |
| 1374 | 4 |
| 13.74 | 4 |
| 0.1374 | 4 |
| 0.01374 | 4 |
| 013740 | 5 |
| 1374.0 | 5 |
| 5100 | 2 |
| 51.00 | 4 |
| 5.100 | 4 |
| 3.51 × 10³ | 3 |
| 2.1 × 10⁻² | 2 |
| 0.4 × 10⁻⁴ | 1 |
a. Rules for Arithmetic operations with significant figures:
1. Rules for multiplication or division:
In multiplication or division, the computed result should not contain greater number of significant digits than in the observation which has the fewest significant digits.
Examples:
(i) 53 × 2.021 =107.113
The answer is 1.1 × 10² since the number 53 has only 2 significant digits.
(ii) 3700 10.5 = 352.38
The answer is 3.5 × 10² since the minimum number of significant figure is 2 (in the number 3700)
2. Rules for Addition and Subtraction:
In addition or substraction of given numbers, the same number of decimal places is retained in the result as are present in the number with minimum number of decimal places.
Examples:
(i) 76.436 +
12.5
88.936
The answer is 88.9, since only one decimal place is found in the number 12.5.
(ii) 43.6495 +
4.31
47.9595
The answer is 47.96 since only two decimal places are to be retained.
(iii) 8.624 –
3.1726
5.4514
The answer is 5.451
(iv) 6.5 × 10⁻⁵ – 2.3 × 10-6 = 6.5 × 10⁻⁵ – 0.23 × 10-5
= 6.27 × 10⁻⁵
The answer is = 6.3 × 10⁻⁵
Dimensions And Dimensional Analysis
All physical quantities can be expressed in terms of seven fundamental quantities. (Mass, length, time, temperature, electric current, luminous intensity and amount of substance). These seven quantities are called the seven dimensions of the physical world.
The dimensions of the three mechanical quantities mass, length and time are denoted by M, L and T. Other dimensions are denoted by K (for temperature), I (for electric current), cd (for luminous intensity) and mol (for the amount of substance).
The letters [L], [M], [T] etc. specify only the nature of the unit and not its magnitude. Since area may be regarded as the product of two lengths, the dimensions of area are represented as [L] × [L] = [L]2.
Similarly, volume being the product of three lengths, its dimensions are represented by [L]3. Density being mass per unit volume, its dimensions are M/L3 or M1L3.
Thus, the dimensions of a physical quantity are the powers to which the fundamental units of length, mass, time must be raised to represent it.
Note: The dimensions of a physical quantity and the dimensions of its unit are the same.
Dimensional Formula And Dimensional Equations
An equation obtained by equating a quantity with its dimensional formula is called dimensional equations of the physical quantities.
Examples:
Consider for example, the dimensions of the following physical quantities.
1. Velocity: Velocity = distance/ time = L/T = L1T-1 \The dimension of velocity are, zero in mass, 1 in length and-1 in time.
2. Acceleration:
Acceleration = \(\frac{\text { Change in velocity }}{\text { time }}=\frac{L^{1} T^{-1}}{T}=L^{1} T^{-2}\)
3. Force: Force = mass × acceleration
Dimensions of force = M × L1T-2 = M1L1T -2
That is, the dimensions of force are 1 in mass, 1 in length and -2 in time.
4. Momentum: Momentum = mass × velocity
Dimensions of momentum = M × L1T-1 = M1L1T -1
5. Moment of a force: Moment = force × distance
Dimensions of moment = M1L1T-2 × L = M1L2T -2
6. Impulse: Impulse = force × time
Dimensions of impulse = M1L1T-2 × T = M1L1T -1
7. Work: Work = force × distance
Dimensions of work = M1L1T-2 × L = M1L2T -2
8. Energy: Energy = Work done
Dimensions of energy = dimensions of work = M1L2T-2.
9. Power: Power = work/time
Dimensions of power \(=\frac{M^{2} L^{2} T^{-2}}{T}p\) = M1L2T-3
Dimensional Analysis And Its Applications
The important uses of dimensional equations are:
- To check the correctness of an equation.
- To derive a correct relationship between different physical quantities.
- To convert one system of units into another.
1. Checking the correctness of an equation:
For the correctness of an equation, the dimensions on either side must be the same. This ‘ is known as the principle of homogeneity of dimensions.
If an equation contains more than two terms, the dimensions of each term must be the same. Thus, if x = y + z, Dimensions of x = dimensions of y = dimensions of z
Example :
Question 1.
Check the correctness of the equation s = ut + 1/2at2 by the method of dimensions.
Dimensions of, s = L1
Dimensions of, u = L1T-1
Dimensions of, ut = L1T-1 × T1 = L1
Dimensions of, a = L1T-2
Dimensions of, at2 = L1T-2 × T2 = L1
The constant 1/2 has no dimensions. Each term has dimension L1.
Therefore, dimensions of, ut + 1/2 at2 = 1
Thus, either side of the equation has the same dimen¬sion L1 and hence the equation is dimensionally correct.
Note: Even though the equation is dimensionally correct, it does not mean that the equation is necessarily correct. For instance the equation s = ut + at2 is also dimensionally correct, though the correct equation, s = ut + 1/2 at2.
2. Deriving the correct relationship between different physical quantities:
The principle of homogeneity of dimensions also helps to derive a relationship between the different physical quantities involved. This method is known as dimensional analysis.
Example :
Question 1.
Deduce an expression for the period of oscillation of a simple pendulum.
The period of the simple pendulum may possibly depend upon
- The mass of the bob, m
- The length of the pendulum, I
- Acceleration due to gravity, g
- The angle of swing, q
Let us write the equation for the time period as t = kma lb gc θd
where, k is a constant having no dimensions; a, b, c are to be found out. ’
The dimensions of, t = T1
Dimensions of m = M1
Dimensions of, l = L1
Dimensions of, g = L1T-2
Angle q has no dimensions (since, q = arc/radius = L/L) Equating the dimensions of both sides of the equation, we get,
T1 = MaLb (L1T-2)c
ie. T1 = MaLb+cT-2c
The dimensions of the terms on both sides must be the same. Equating the powers of M, L and T.
a = 0; b + c = 0; -2c = 1
∴ c = \(\frac{-1}{2}\), b = –c = \(\frac{1}{2}{/latex]
Hence, the equation becomes,
t = kl1/2, 2g-1/2
ie, t = k[latex]\sqrt{l/g}\)
Experimentally, the value of k is found to be 2p.
Limitations of Dimensional Analysis:
The method of dimensional analysis has the following limitations:
- It gives no information about the dimensionless constant involved in the equation.
- The method is not applicable to equations involving trigonometric and exponential functions.
- This method cannot be employed to derive the exact form of the relationship, if it contains sum
of two, or more terms. - If the given physical quantity depends on more than three unknown quantities, the method fails.
3. Conversion of one system of units to another:
Suppose we have a physical quantity of dimensions a, b and c in mass, length and time. The dimensional formula for the quantity is therefore, MaLbTc. Let its numerical value be n, in one system in which the fundamental units of mass, length and time are M1, L1 and T1 respectively. Then, the magnitude of the physical quantity
= n1 M1aL1bT1c
Also, let the numerical value of the same quantity be n2 in another system where the fundamental units of mass, length and time are M2, L2 and T2respectively. Then the magnitude of the quantity
= n2 M2aL2bT2c
Equating, n2 M2aL2bT2c =
n1 M1aL1bT1c

Example :
Question 1.
Find the number of dynes in one newton.
Answer:
Dyne is the unit of force in the C.G.S. system and newton is the S.I.unit. The dimensional formula for force is M1L1T-2. In eqn. (1) let the suffix 1 refer to quantities in S.I and 2 those in the C.G.S. system.
Here, a = 1, b = 1 and c = 2
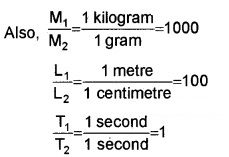
and n1 = 1 (ie. one Newton)
By eqn. (1),
n2 = 1 (1000)1 (100)1 (1)-2 = 105
ie. 1 newton = 105 dynes.
