Errors in Measurements
Since no measurement can be absolutely accurate, there will always be some sort of error in a measurement. An error is the difference between the measured value and the actual value.
- If an error cannot be eliminated or reduced, it must be considered as part of the measurement.
- There are two main types of errors in measurements, namely systematic errors and random errors.
Systematic Errors
- Systematic errors are errors in measurements due to the condition of the measuring instrument or the state of the environment in which the measurements are taken.
- A systematic error is usually unavoidable and is always the same. This means that the reading of a measurement is always bigger than the actual value or it is always smaller than the actual value.
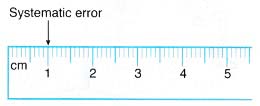
- A cause of systematic error is errors in calibration of instruments. The meter rule in Figure may look normal at first glance but a careful study shows that it is wrongly calibrated as its first 1 cm is actually only 0.9 cm. Hence, the readings of the measurements using this metre rule are always bigger than their actual value.
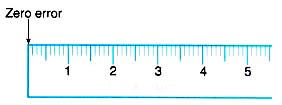
- Another cause of systematic error is zero error. Zero error is due to non-zero reading when the actual reading should be zero. This error is usually due to the fact that the pointer of the instrument does not return to zero when it is not being used. Figure shows a meter rule with a zero error. The end of the ruler has worn out and gives a reading of 0.1 cm instead of 0 cm. Hence, the readings of the measurements using this meter rule are always bigger than their actual value.
Random Errors
- Random error occurs due to mistakes made by the observer using incorrect positioning of the eye or the instrument when making a measurement. It may also occur when there is a sudden change of environmental factors like temperature, air circulation or lighting.
- When taking a reading, you should look at the scale of the instrument from a point directly in front of it. Otherwise, error will occur in your measurement.
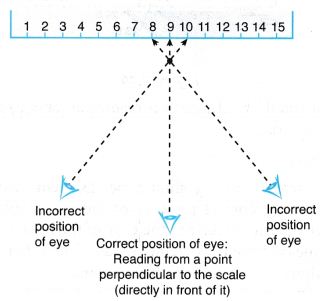
- Parallax error is a random error due to the inaccurate positioning of the eye when taking the reading of a measurement. Figure shows how parallax error occurs when taking a reading from a ruler.
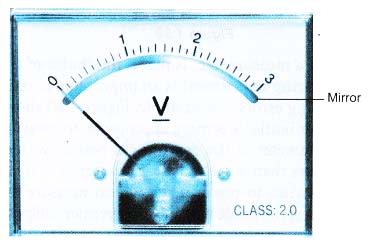
- An electrical meter with a mirror just beneath the needle helps to reduce parallax error. Parallax error is eliminated when the needles image is hidden behind the needle itself.
Example 1. Figure shows three different positions of the eye of an observer when measuring the length of a physics book.
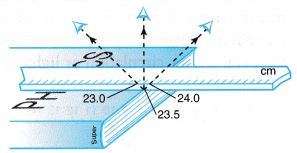 What should be the correct reading in cm? Explain your answer.
Solution:
The correct reading should be 23.5 cm. This is because the correct position of the eye should be directly perpendicular to the edge of the book where the measurement is being made. The other two positions will result in parallax
Techniques to Reduce Errors in Measurements
- It is important to reduce errors in measurements as much as possible in order to increase their accuracy.
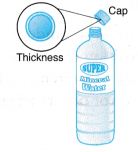
- When a measurement is made, the choice of the measuring instrument is an important factor in reducing errors. For example, Figure shows a water bottle. It is more appropriate to measure the diameter of the cap using a pair of vernier callipers than a metre rule. However, it is more appropriate to use a meter rule to measure the height of the bottle than a pair of vernier callipers.
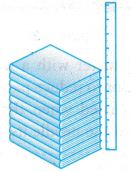
- When no appropriate measuring instruments are available, proper techniques in measurements are desirable to ensure better accuracy. Figure shows how a stack of 10 identical books can be measured using a meter rule to determine the thickness of one of the books. If the height of the stack of books is h cm, then the thickness of a h book is h/10 cm.
- Another way to reduce error is to repeat the measurement a number of times and find the mean (average). This will serve to reduce experimental errors caused by poor alignment of object and instrument, misreading and non-uniform objects.
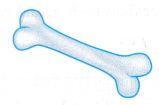
(a) Figure shows an athlete clearing a high jump bar. To determine the height of the bar, measurements are taken at different places and the average value is calculated to ensure greater accuracy.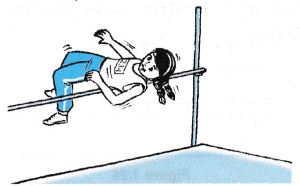 (b) Figure shows a bone. To determine the diameter of the bone, measurements are taken at various parts of the bone using a pair of vernier callipers and the average value is calculated to reduce error due to non-uniformity of the shape of the bone.
 (c) Figure 1.34 shows a boy using a stopwatch to determine the period, T, of oscillation of a pendulum. As the value of T is very small and is difficult to determine accurately using a stopwatch, it is easier to measure the time, f, for 10 oscillations and determine the
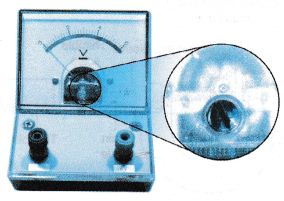
period, T, using the formula T = t/10.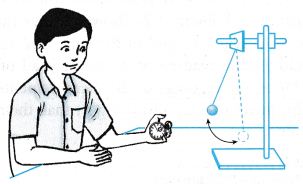 5. It is important to check a measuring instrument for zero error before using it. For some instruments, like the voltmeter in Figure, zero error can be taken care of by adjusting the pointer to zero before making any measurements.
 6. When adjustments cannot be done to take care of zero error, the value of this error must be noted and all the subsequent readings have to be corrected by deducting this value.
To Increase the Accuracy of Measurements
When we reduce errors, we will increase the accuracy of measurements. Hence, the following are the ways to increase the accuracy of measurements:
- Use appropriate measuring instruments.
- Use appropriate techniques in taking measurements.
- Make repeated measurements and take the average value.
- Avoid parallax error.
- Take into account zero errors.
Example 1. Figure (a) shows the position of the pointer of a voltmeter when it is not taking any measurements. Figure (b) shows the same voltmeter when taking a measurement.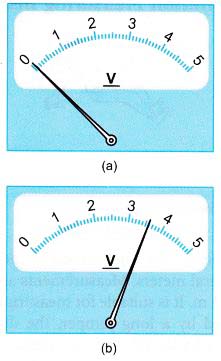 (a) What is the value of the zero error of the voltmeter?
(b) What is the value of the voltage measured?
Solution:
(a) Zero error = 0.1 V
(b) Value measured = 3.6 – 0.1 = 3.5 V
Example 2. A worn out ruler is used to measure the length of a school badge as shown in Figure.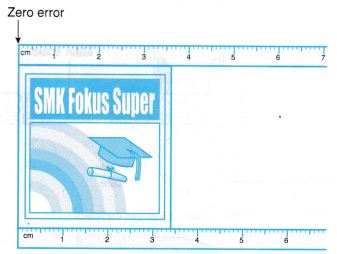 (a) What is the value of the zero error of the ruler?
(b) What is the length of the badge?
Solution:
(a) The value of zero error due to the worn out end of the ruler is 0.2 cm.
(b) Therefore, the measured length of the badge is = 3.6 cm – 0.2 cm
= 3.4 cm.
